Prerequisites
Downloading LSMC 11
Begin the LSMC 11 download by clicking the button below:
Creating a Bootable LSMC 11 USB Drive
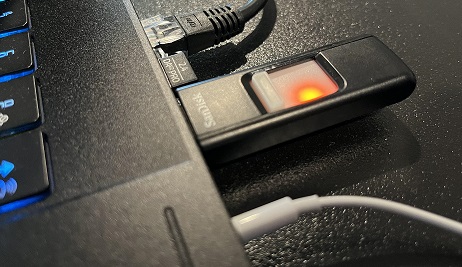
Insert a USB drive into the computer.
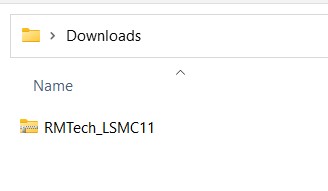
Download LSMC 11 and locate the newly downloaded file.
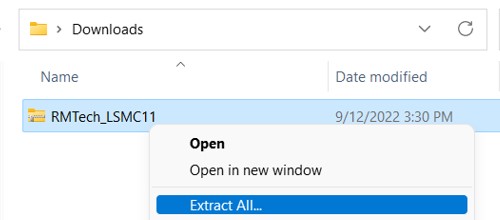
Right-click the downloaded LSMC 11 compressed folder and select “Extract All”.
Next, open the newly extracted folder and open Rufus. This is the program that will be used to create the bootable LSMC USB drive.
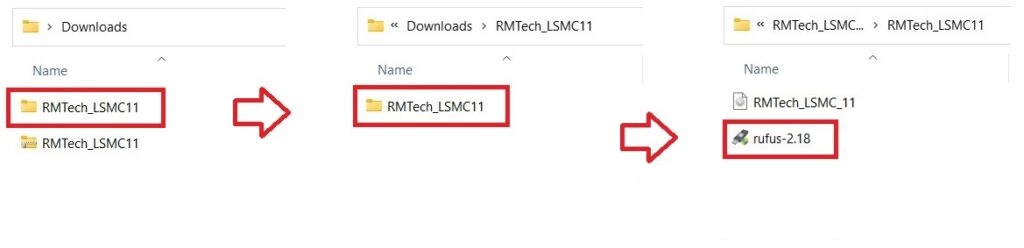
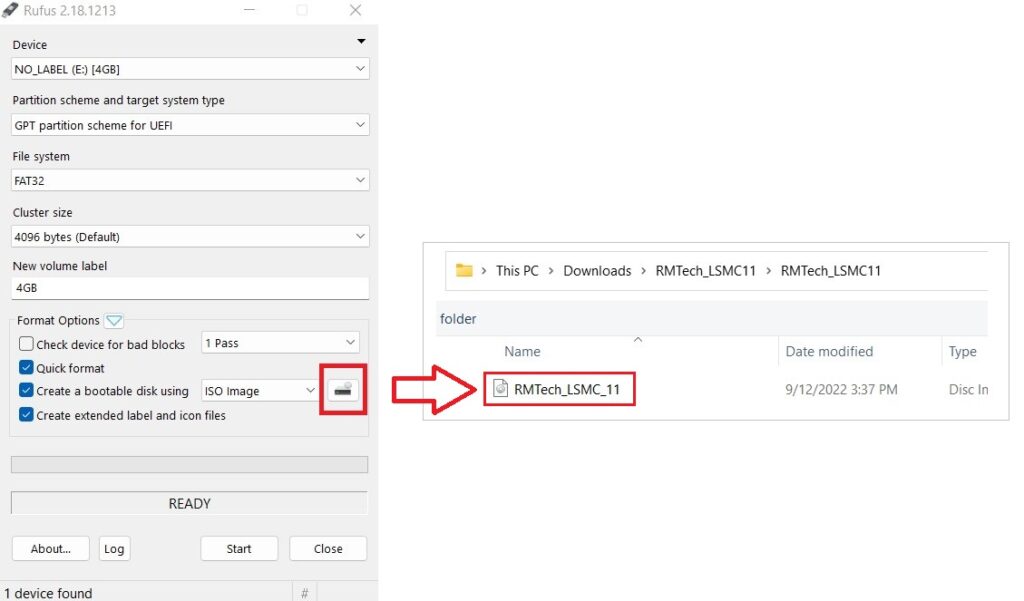
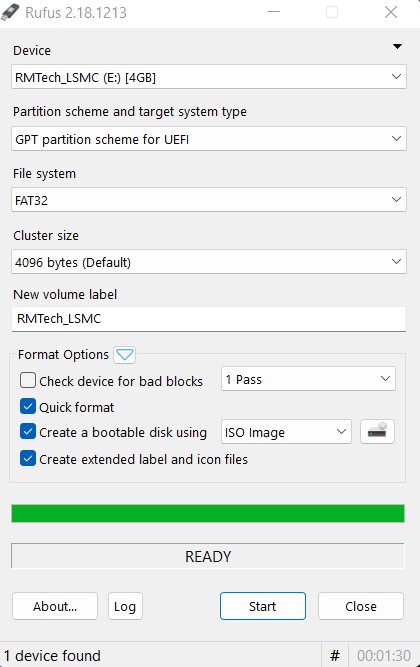
Once Rufus is open, click the button to select an image, then select the LSMC .iso image.
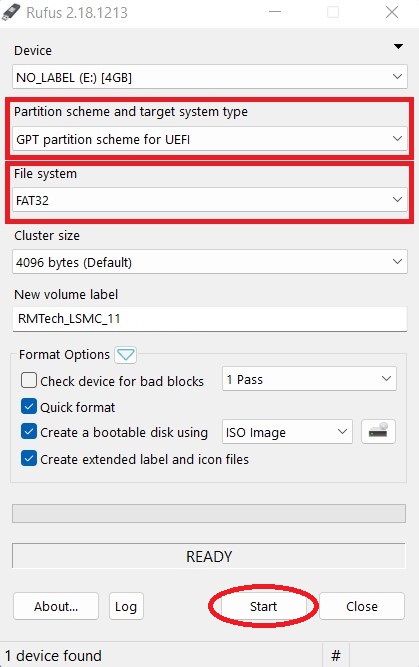
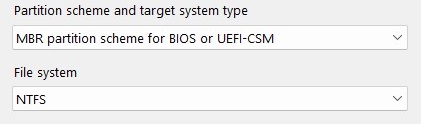
Ensure that both settings (partition scheme and file system) shown below match your settings and click “Start”.
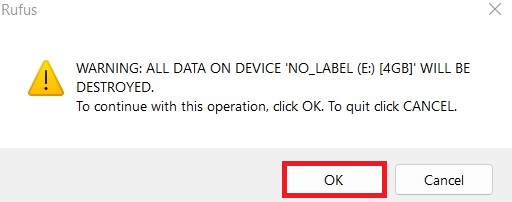
Rufus will warn you that ALL DATA on the USB drive will be destroyed. Click “OK” to continue.
Once the operation completes it is time to remove the USB drive and insert it into the computer you wish to use LSMC on.
Booting the Computer From the LSMC 11 USB Drive
Power off the computer that you wish to install LSMC on and insert the USB drive. The trick to booting the computer from external media is finding the correct key(s) to press to bring up the boot menu as soon as you turn on the computer.
The following chart lists the boot menu key(s) for many popular brands:
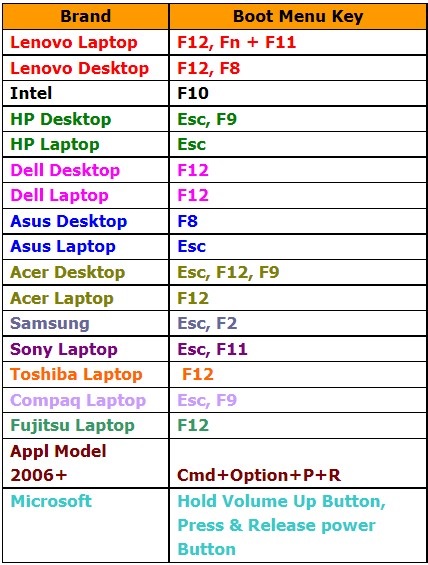
It is possible that your computer is not listed, or the boot menu key has changed in between models. If that is the case you will need to consult Google or your preferred search engine for the correct information. Let’s say that you have an MSI GS66 laptop… head over to google.com and search – MSI GS66 boot menu key.
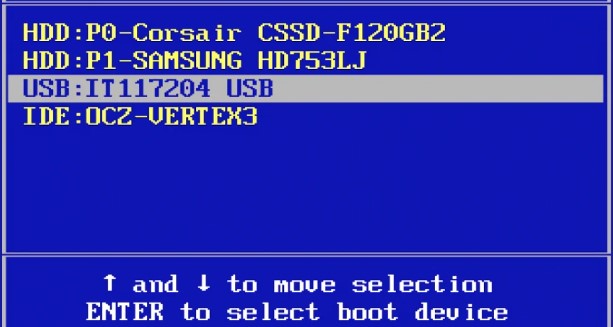
Once you find the correct key or combination of keys, you will want to start pressing them as soon as you power on the computer. If you had success, you will be presented with a boot menu. Depending on the make/model of the computer this menu will probably look different, but the functionality is the same. You will use this menu to select the USB drive. Although it should be pretty straight-forward, depending on the disk configuration of the computer you may have to take an educated guess.
Below is a screen capture of a sample boot menu with the USB device selected:
Some computers may also have a boot menu that looks similar to this:
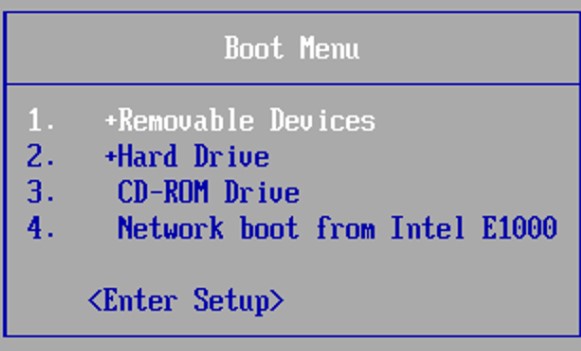
Notice the “+” next to “Removable Devices” and “Hard Drive”. If your boot menu looks like this you need to select one of those options to see the USB device. Sometimes it is under “Removable Devices”, but I have also seen it under “Hard Drive”.
If you do not see the USB device, the reason could be a number of things as follows:
1.) The USB drive is faulty. Normally you would notice this right away or when using Rufus to copy the image, but that is not always the case. I have encountered a few USB drives that would not consistently show up in the boot menu; using a different USB drive solved the issue.
2.) The USB drive was provisioned incorrectly. This is not as common as it used to be, however some older computers require bootable media to be created using a different partition scheme and file system. If you suspect this to be the issue, try the following settings in Rufus and recreate the bootable USB drive:
3.) The USB port is faulty. Either the USB port is faulty, or the motherboard is particular about which USB port can be used for bootable media. Either way, use a different USB port if one is available and try again.
4.) Use of a USB adapter or hub. I know that sometimes this is unavoidable. For example, the Surface Go only has a single USB Type-C port so I understand that an adapter would most likely be necessary. If you suspect this to be the issue you should try a different adapter, reseat the adapter as well as the USB drive plugged into it, or eliminate any USB hubs if you are able to.
Getting Started With LSMC 11
The Compatibility Tool
We want you to feel confident that LSMC 11 is going to work before you purchase it, which is why we created the compatibility tool. This tool was designed to give you highly accurate results pertaining to the compatibility of LSMC 11 on the computer you plan to use it on.
Installing and Using the Compatibility Tool
Preparation:
Step 1: Download LSMC 11
Step 2: Create your LSMC bootable USB drive
Step 3: Boot the computer into the LSMC Setup
Installation:
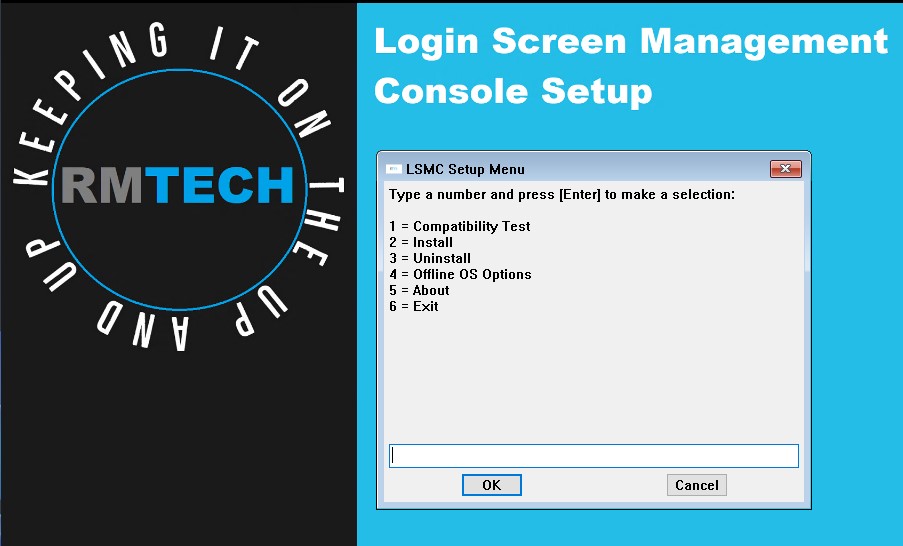
Once the computer has finished booting from the USB media, you will see the LSMC installation main menu.
To begin the compatibility tool installation, select option “1” and press [Enter].
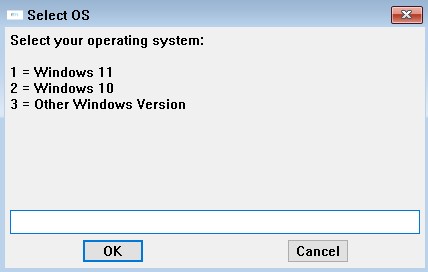
When you are done reading the following text press [Enter] to continue and select your Windows version.
If you are unsure which Windows version is installed or the computer is running Windows 7/Windows 8, select “3” – Other Windows Version and press [Enter].
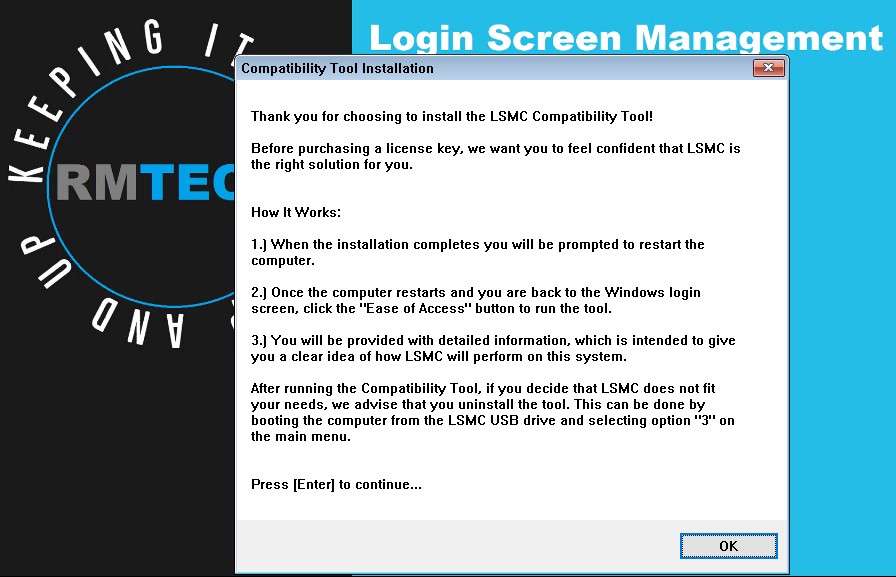
The compatibility tool will begin to install…

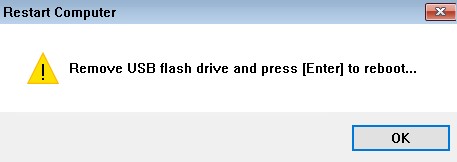
After a few moments you will be prompted to restart the computer. Remove the USB drive and press [Enter].

Once the computer has restarted and you find yourself back on the Windows login screen, click the following button to launch the compatibility test:
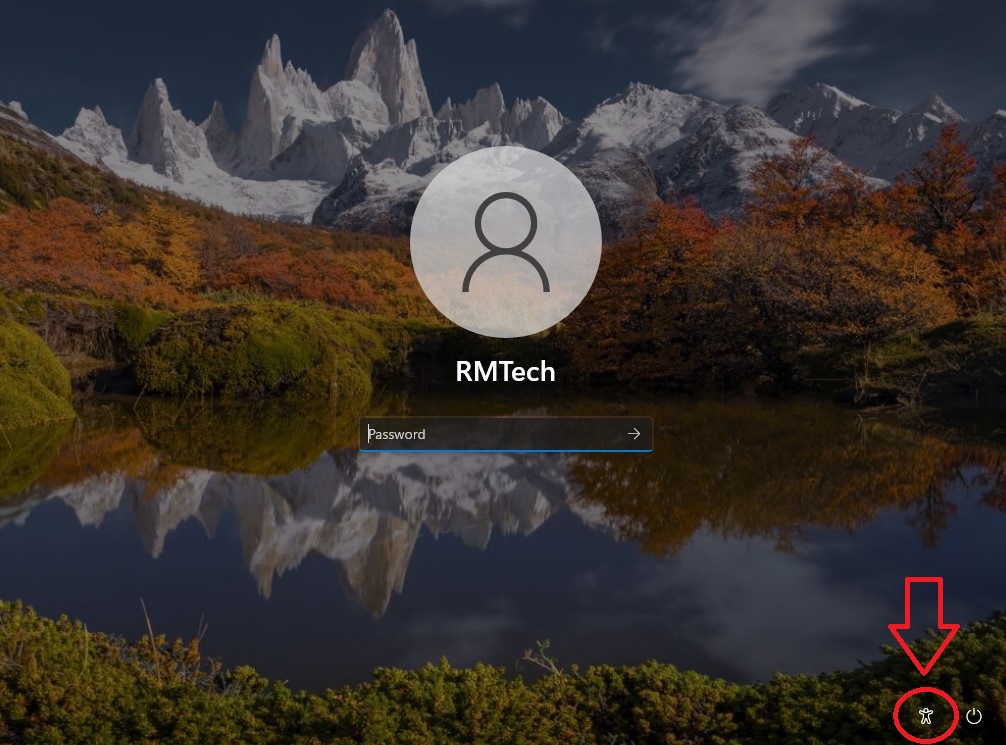
The screen capture shown above was taken from a computer running Windows 11. There may be slight differences in the way this button looks depending on which version of Windows you are running.
Once you click the button you will be given 1 out of 4 possible results:
1.) LSMC is fully compatible.
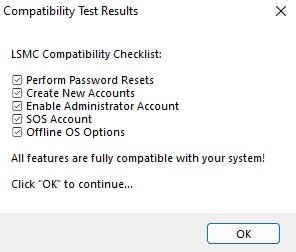
This indicates that all tests have passed.
If you decide to purchase LSMC 11, we can fully guarantee that it is capable of getting you back into your computer and allowing you to access all of your important files.
2.) LSMC is compatible, however a Microsoft account was detected.
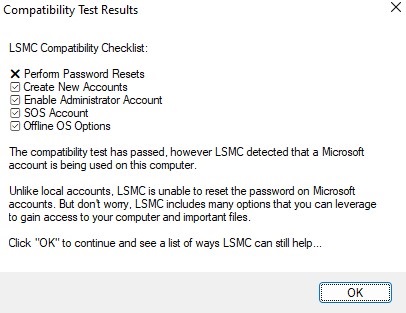
This will likely be the most common result users will see. It means that LSMC is compatible but a Microsoft account was detected, which makes it a little bit more difficult to perform a simple password reset.
Even though LSMC cannot be used to directly reset the password on a Microsoft account, you can still use it to gain access to the computer and your important files using one or more of the following methods:
- Install LSMC and use it to either create a new account or enable the built-in administrator account.
- Install LSMC and utilize the SOS account.
- Boot from the LSMC USB drive and use the “Offline OS Options” to enable the built-in administrator account.
- Boot from the LSMC USB drive and use the “Offline OS Options” to convert the Microsoft account to a local account, which will allow LSMC to perform a password reset.
If you decide to purchase LSMC 11, we can fully guarantee that it is capable of getting you back into your computer and allowing you to access all of your important files.
3.) LSMC is not compatible with your system.
If you receive this result, we cannot guarantee that LSMC is capable of getting you back into your computer, nor do we recommend that you purchase the software at this time.
4.) Nothing happens when the button to run the compatibility test is clicked.
If you receive this result, we cannot guarantee that LSMC is capable of getting you back into your computer, nor do we recommend that you purchase the software at this time.
We hope that the information provided by the compatibility tool helps aid in your decision on whether or not LSMC 11 is the right solution for you. If you want to move forward using LSMC 11, you can install it directly without the need to remove the compatibility tool first.
If you have no further interest in LSMC it is recommended that you uninstall the compatibility tool by using option “3” on the LSMC 11 installation main menu.
Installing LSMC 11
Preparation:
Step 1: Download LSMC 11
Step 2: Create your LSMC bootable USB drive
Step 3: Boot the computer into the LSMC Setup
Installation:
Once the computer has finished booting from the USB media, you will see the LSMC installation main menu.
To begin the LSMC 11 installation select option “2” and press [Enter].
If you are unsure which Windows version is installed or the computer is running Windows 7/Windows 8, select “3” – Other Windows Version and press [Enter].

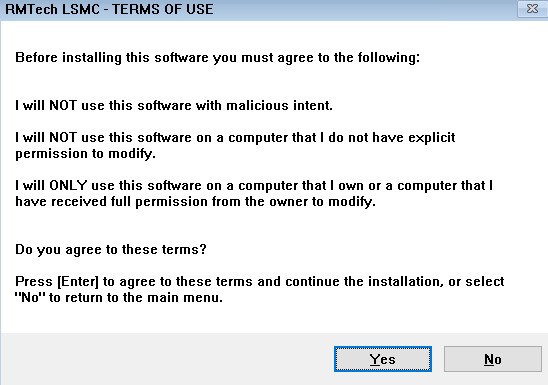
You must agree to the terms of use before continuing. Press [Enter] to agree and continue, or select “No” to exit the installation.
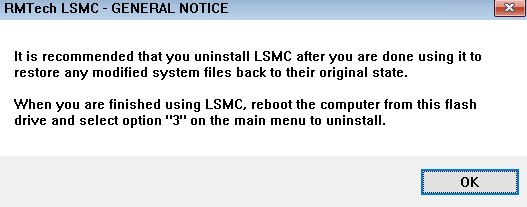
The next message indicates that you should uninstall LSMC when you are done using it. Press [Enter] to continue…
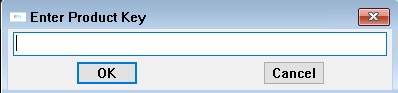
You will now be prompted to enter the product key that you received after purchasing LSMC. Type the product key and press [Enter] to continue…
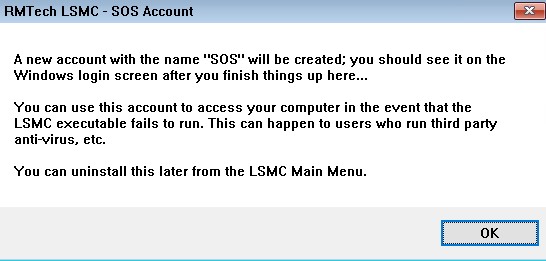
Lastly, this next message indicates that an account named “SOS” will be created. This account can be used to gain access to the computer in the event that the main LSMC program fails to run due to any potential unexpected circumstances. Think of it as a “back-door” that you can use in a hurry if something were to go wrong.
You can manually uninstall the SOS account later, but it will also uninstall itself once LSMC is used to either reset a password, create a new account, or enable the built-in administrator account. This was an intentional design decision to keep things as clean as possible, assuming that the user would not have a need for the “SOS” account once they have used LSMC to perform one of the tasks just mentioned.
Press [Enter] and the LSMC 11 installation will begin…
Just hang tight during this time…
The screen will change to the following after a few moments. Continue to wait for a few more seconds and you will be prompted to restart the computer.
Remove the USB drive and press [Enter] to restart the computer.
Launching LSMC
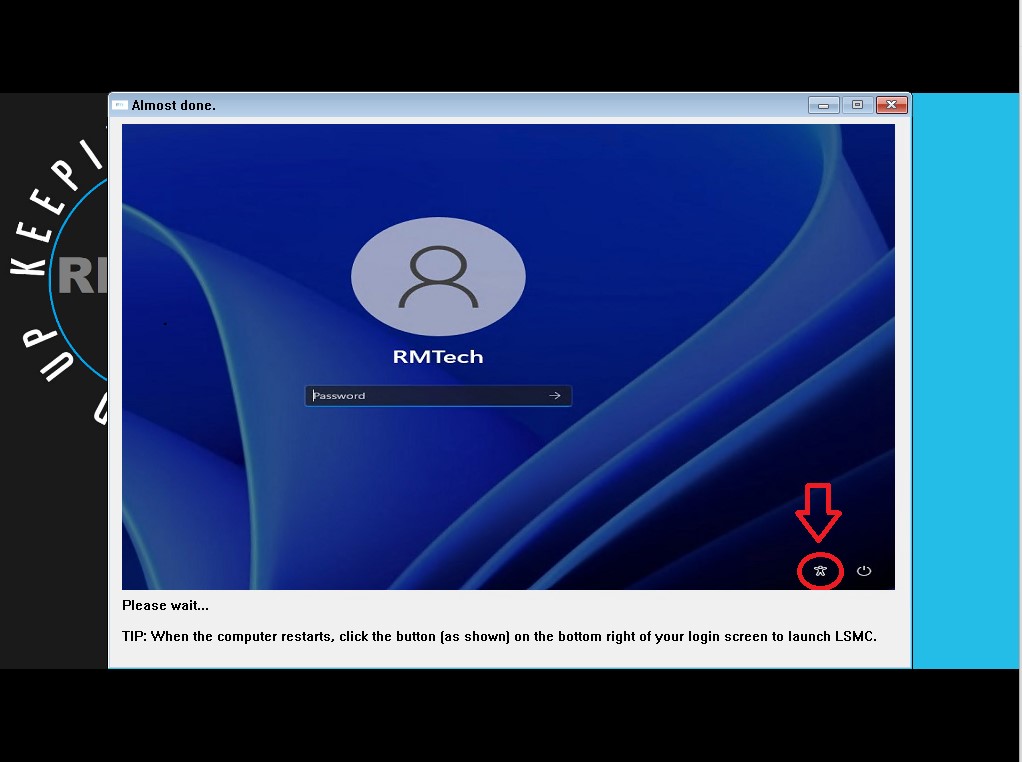
Once the computer has restarted after completing the LSMC installation, click the button shown below to launch LSMC:
The screen capture shown above was taken from a computer running Windows 11. There may be slight differences in the way this button looks depending on which version of Windows you are running.
You will be presented with the LSMC 11 main menu:
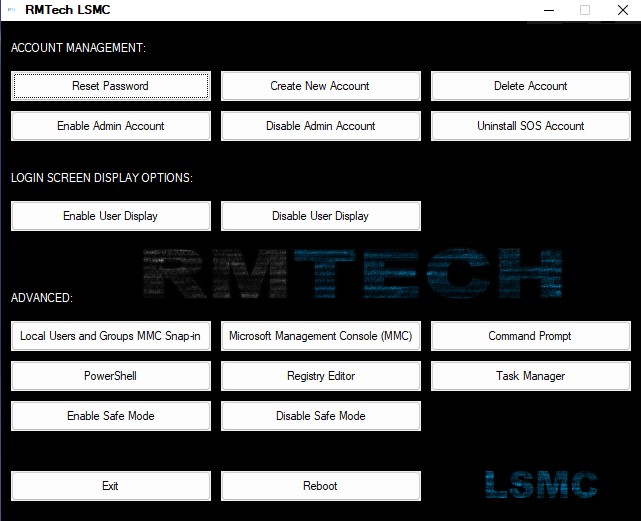
Using LSMC 11 to Gain Access to Your Computer
Resetting the Password on a Local Account
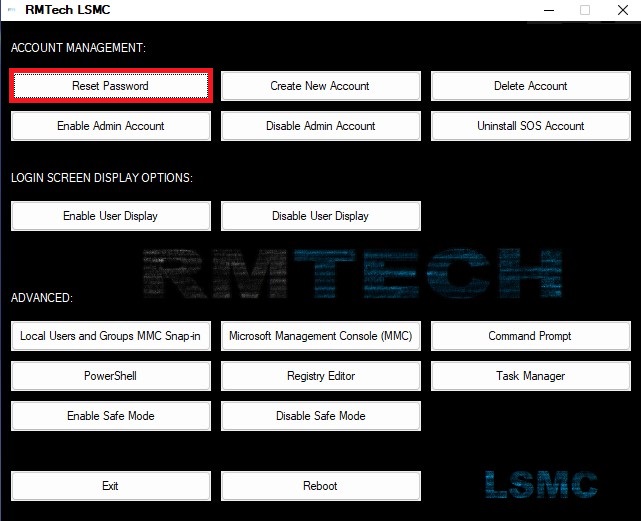
On the LSMC 11 main menu, click the button labeled “Reset Password”.
You will need to manually type the user account name, but make sure you pay special attention… sometimes the account name appears differently to the operating system vs what you see on the login screen.
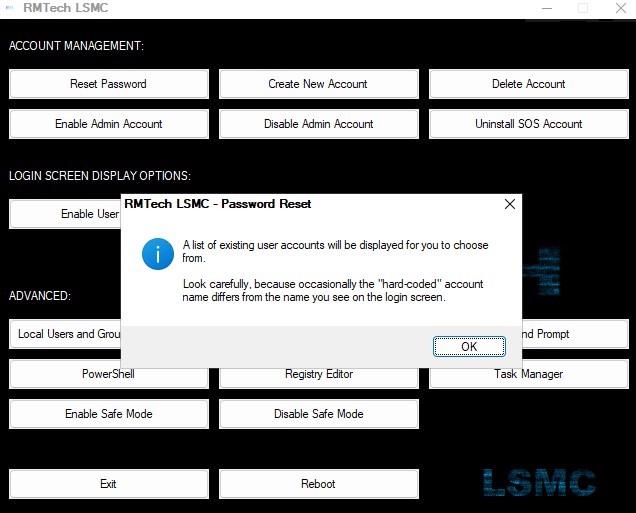
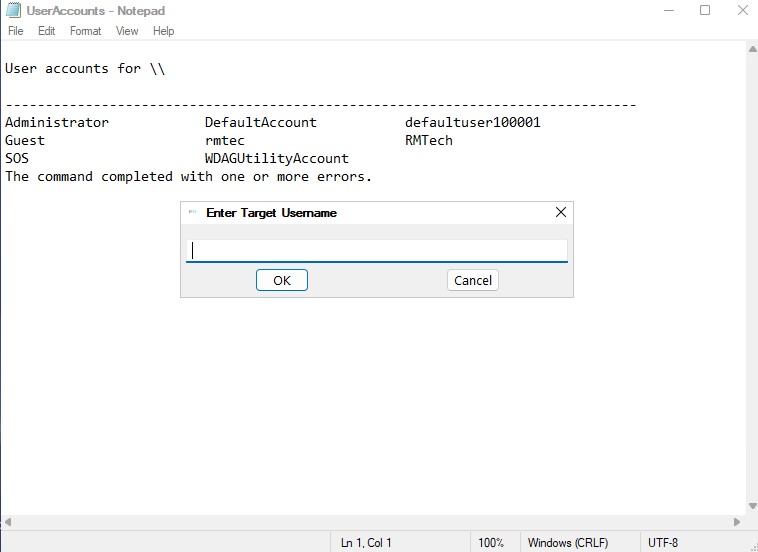
You will be shown a list of user accounts to choose from. Most of the time it is clear which account is which, however sometimes you might have to make an educated guess. Type the name of the user account you wish to reset the password on and click “OK”.
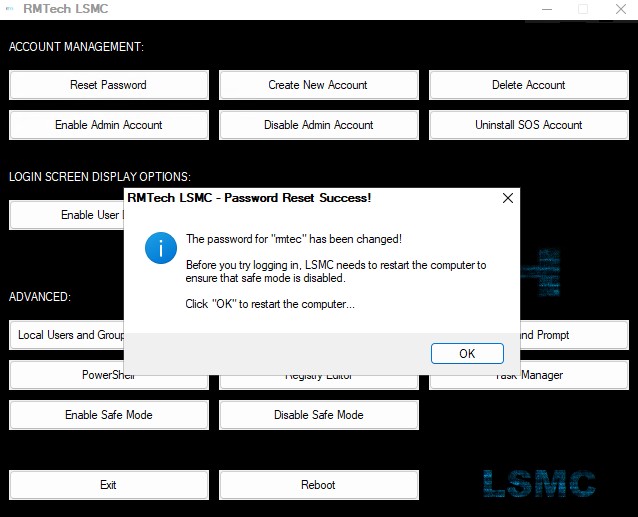
Next, type the desired new password for the account and click “OK”.

If this is the first time you have used LSMC to perform a password reset, it is mandatory that the computer be restarted to ensure that it is taken out of safe-mode. Click “OK” and the computer will restart.
Once the computer restarts and you arrive back at the Windows login screen, you may notice that the SOS account has been removed if it was never previously logged in to. This is intentional as an effort to “keep things clean” since it is clear at this point that the SOS account is not needed.
Next, try logging into the computer with your new password.
Resetting the Password on a Microsoft Account
This is where things get tricky… because LSMC can’t reset the password on a Microsoft account. Or can it?? Well, the answer is no it can’t. But it can convert the Microsoft account to a local account and then reset the password on that newly converted account.
To find out more, refer to the section in this documentation titled – Converting Microsoft accounts to local accounts.
Creating a New Local Account
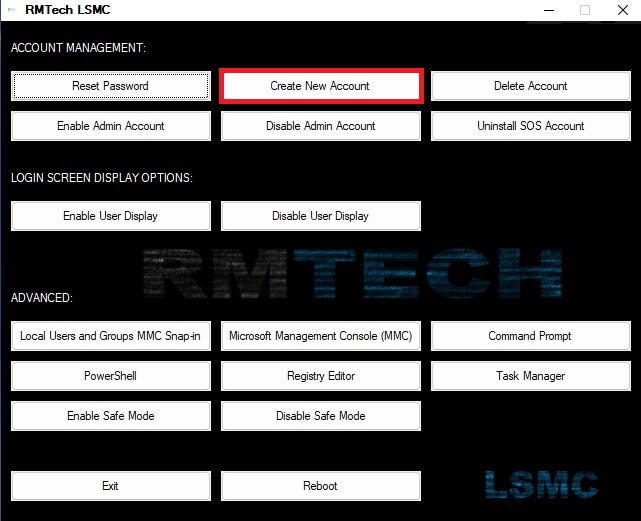
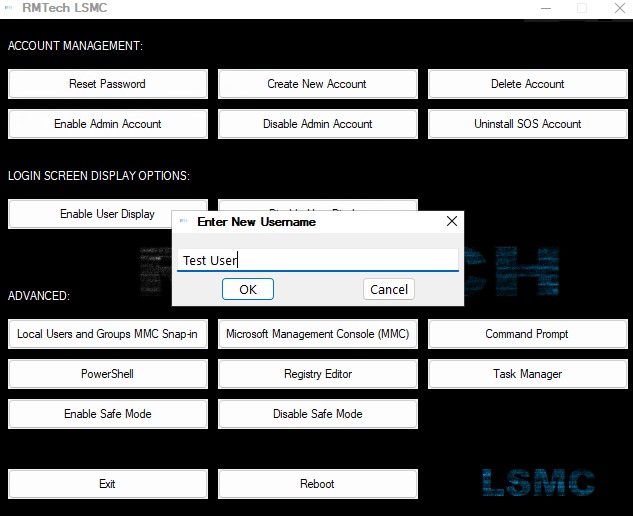
On the LSMC 11 main menu, click the button labeled “Create New Account”.
Type the desired new account name.
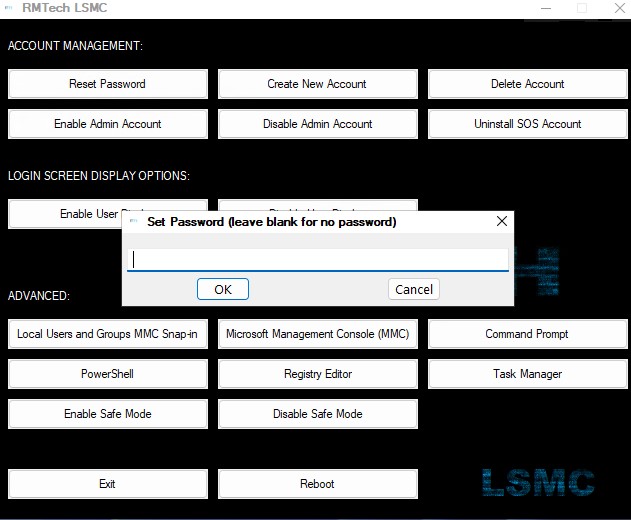
Type a password or leave this box blank for no password.
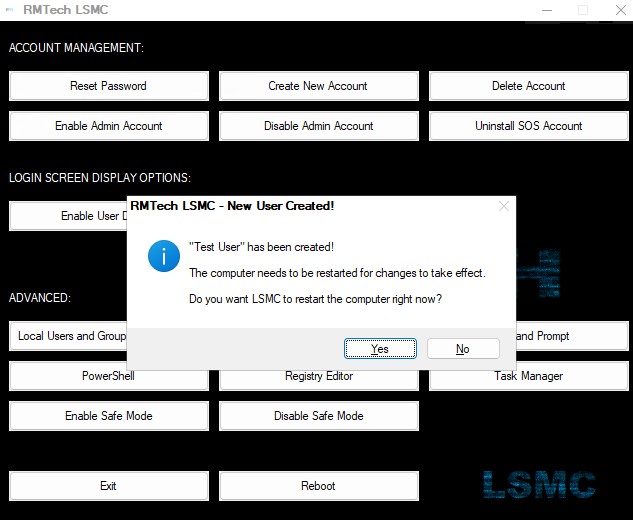
Click “Yes” to restart the computer.
Next, try logging into the computer with your new account.
Enabling the ‘Built-In’ Administrator Account
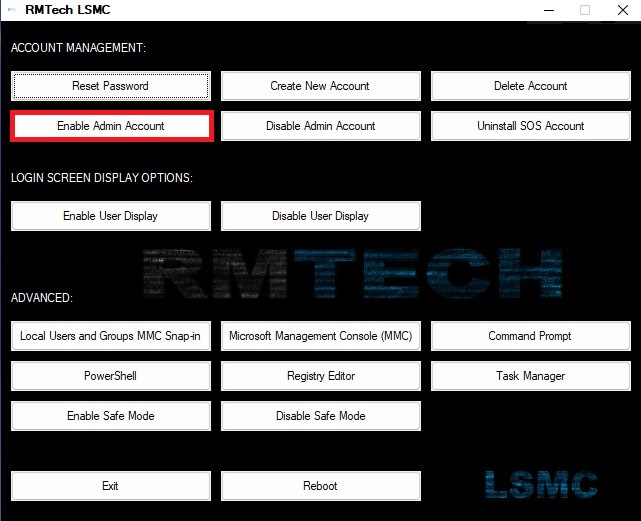
On the LSMC 11 main menu, select the option labeled “Enable Admin Account”.
Click “Yes” to restart the computer.
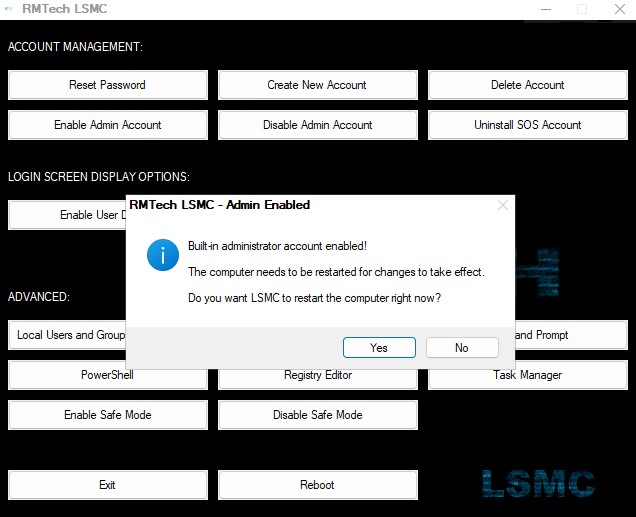
Next, try logging into the computer with the built-in administrator account.
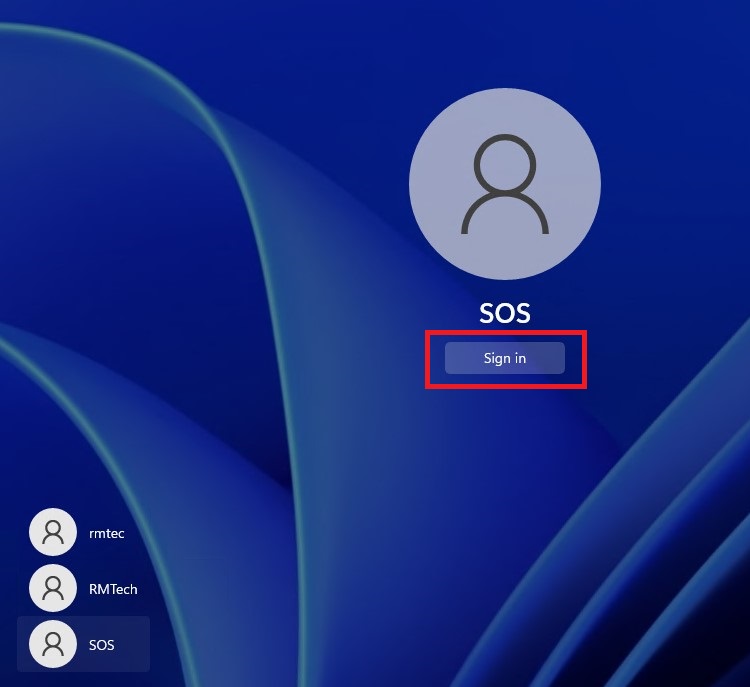
Using the SOS Account
If the LSMC program fails to run for any reason, you can use the SOS account to gain access to the computer.
Once LSMC is installed and you are back to the Windows login screen, you will see an account named “SOS”. Click on the account, then click “Sign in” to log into the SOS account.

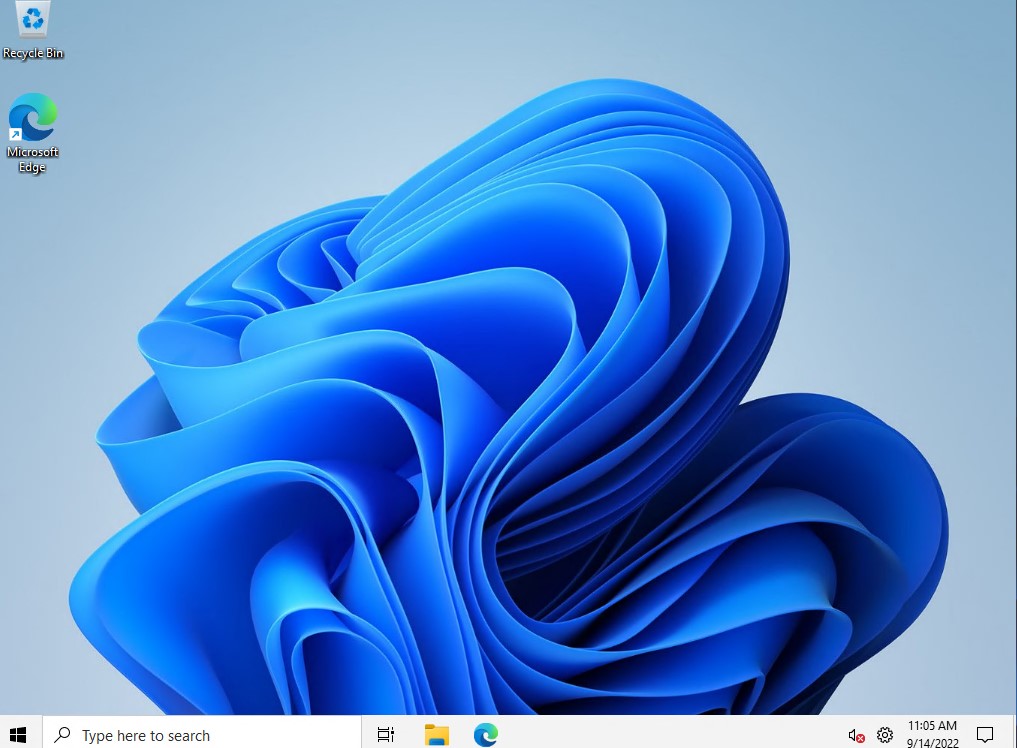
Windows will begin setting up the account.

You will briefly be taken to the desktop of the SOS account, but don’t touch anything just yet…
LSMC will need to restart the computer to finalize some changes.

The computer will restart automatically. When the restart is complete you will not be logged back into the SOS account automatically, you will be brought back to the Windows login screen.
Log back into the SOS account and enjoy using your computer once again. You can continue to use this account as is, you can rename it, or use it to create another account to use permanently. The choice is all yours. Just don’t forget to uninstall LSMC afterwards!
Using the Offline OS Options
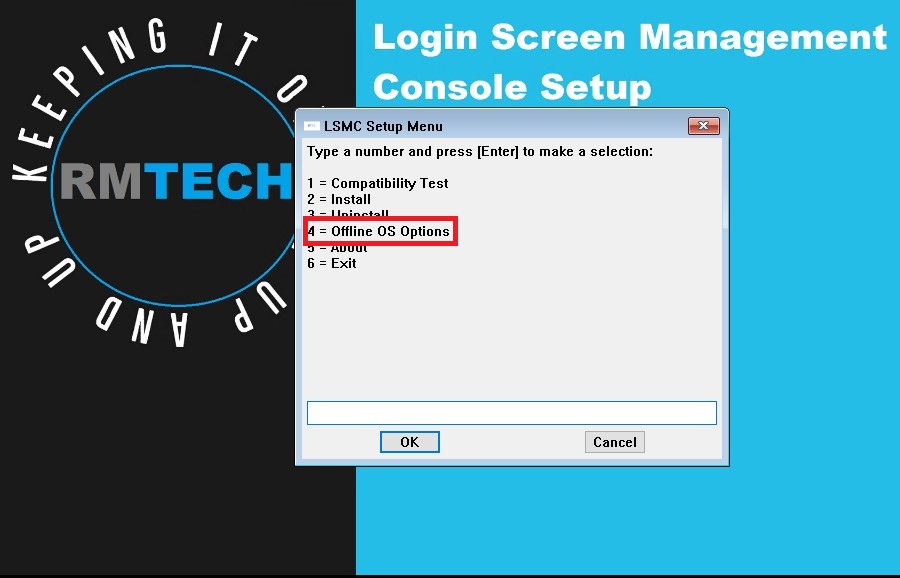
About Offline OS Options
The LSMC 11 Offline OS Options are a completely different set of tools to perform specific tasks while Windows is offline. Some of these tasks can only be performed while Windows is offline, while other options such as – Enabling the built-in Administrator Account serve as a backup option in the event that LSMC fails during normal operations.
Accessing Offline OS Options does require you to have a valid product key for LSMC 11. Accessing this menu is as simple as booting the computer from the LSMC USB drive and selecting option “4” on the main menu.
Enter your product key.
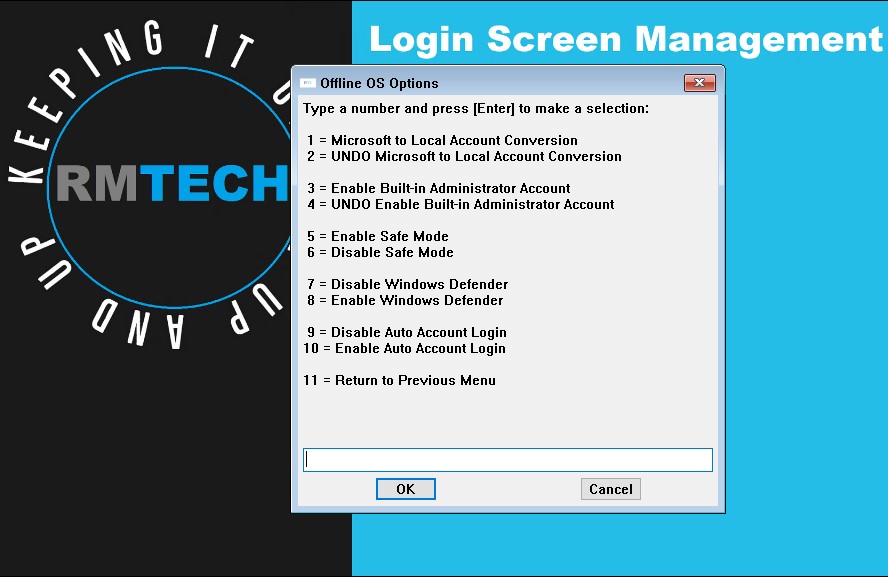
The Offline OS Options main menu is displayed.
Converting Microsoft Accounts to Local Accounts
For users that absolutely must reset the password on their Microsoft account – This option is for you.
This option will strip ALL Microsoft accounts on the system of their “internet-linked” status. This results in those accounts appearing to Windows as standard local user accounts. LSMC can then be used to perform a password reset.
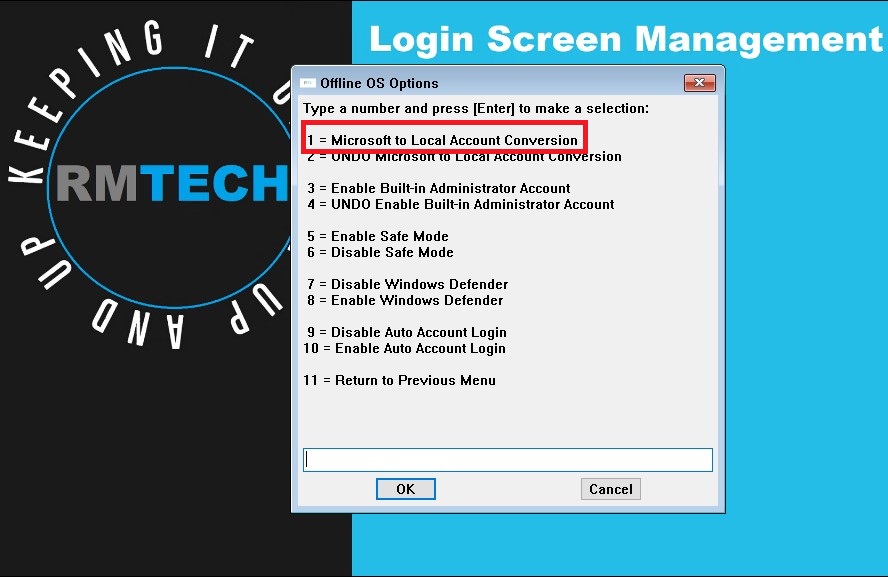
To get started, select option “1” on the Offline OS Options menu.
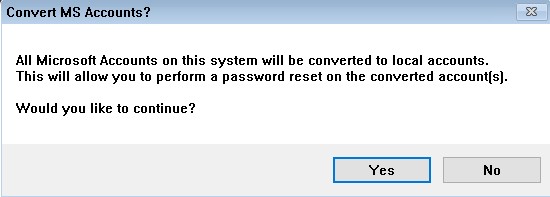
Click “Yes” to continue.
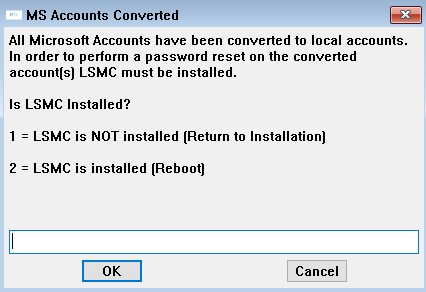
LSMC needs to be installed in order to reset the password on the converted account(s). If LSMC is not currently installed, select option “1”. This will bring you back to the main menu where you will be able to install LSMC.
If LSMC has already been installed, select option “2” to restart the computer.
Remove the USB drive from the computer and press [Enter] to restart.
Once the computer restarts, refer to the section in this documentation titled – Resetting the password on a local account.
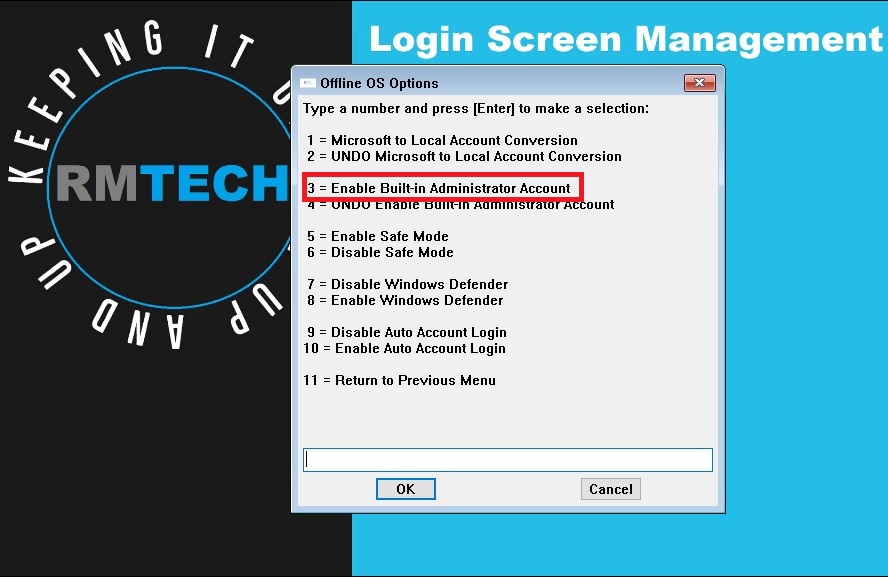
Enabling the ‘Built-In’ Administrator Account
Enabling the built-in administrator account via the Offline OS Options as opposed to the standard method can be a handy last resort option. It’s geared towards users that have tried everything else with no luck. Let’s say that you’re in a situation where you installed LSMC and it doesn’t run like it should and neither did the SOS account. Enabling the built-in administrator account while Windows is offline is the next thing you need to try.
To get started, select option “3” on the Offline OS Options menu.
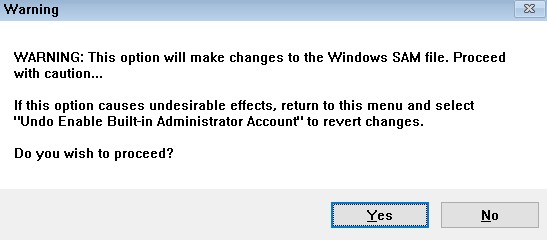
Make sure you read and understand the following message. Press [Enter] when you are ready to continue.
Once the operation completes you will be prompted to restart the computer.

Remove the USB drive from the computer and press [Enter] to restart.
Once the computer restarts, you should now see an account named “Administrator” on your Windows login screen. Try to log in using this account; it should not have any password on it.